Donc hier je vous présentais le Carabag, voici donc le tuto !! / So yesterday I was showing you the Carabag, here is the tutorial!!
Il vous faudra / You will need:
1 yard de tissu Carabag (J’ai pris le Kona®) / 1 yard of the Carabag fabric (I used the Kona®)
– Uniquement disponible sur Spoonflower (les frais de port sont minis malgré tout 😉 ) dans un premier temps, j’en mettrai dans ma boutique Etsy par la suite / Only available on Spoonflower for the time being, I will soon put some in my Etsy shop too –
1 feuille de 50cmx50cm de molleton pas trop épais / 1 sheet of 50cmX50cm or 19 1/2″X19 1/2″ of polyfibers/padding/foam not too thick
1 peu de ouate pour remplir les voitures et personnages / A bit of polyfill to fill the animals and cars
1 petit morceau de ficelle (environ 15cm) / A little piece of cord (about 15cm or 6″)
Une machine à coudre (ou beaucoup de patience pour tout faire à la main) / A sewing machine (or a lot of patience to sew everything by hand)
Du fil (vert, blanc, écru, gris… comme vous voulez !) / Some thread (green, white, ivory, grey… as you want!)
Une fois que vous avez réuni tout ça, c’est parti ! Once you have gathered everything, here we go!
En premier, couper tous les morceaux en suivant les lignes extérieures, les marges de couture sont donc comprises. / First of all, cut all the pieces following the outside line, the seam allowances are therefore included.

Poser et épingler la feuille de molleton au milieu et au dos de la feuille où le circuit est dessiné. / Lay and pin down the padding sheet in the middle of the back of the car roads piece.

Retourner la feuille de circuit et surpiquer tout autour des routes, ainsi que les limites des places de parking. / Turn around the road piece and topstitch all around the roads, topstitch in between the parking spaces too.

Plier dans le sens de la longeur les deux rectangles, l’endroit du tissu à l’intérieur (futures poignées) et les coudre à 1.5cm du bord sur la longueur, puis les retourner sur leur endroit. / Fold lenghtwise the two rectangles, putting the right side of the fabric inside (these will be the grips). Sew them at 1.5cm or 5/8″ from the edge in the length of the fabric and then turn them around on their right sides.

Pour faire le toit du parking, prendre la pièce à sur son envers, l’écriture dans le bon sens, lisible donc, puis replier et repasser les deux parties hautes des triangles, de chaque côté, de manière à ce que le bord du tissu repose sur la limite de l’impression. / To make the parking roof/car park roof, take the piece on the wrong side, the writting in the right way, therefore readable, then fold and iron each top part of the triangles of both sides making the edge of fabric fold on the line of the parking/car park drawing underneath.

Retourner encore une fois de manière à ce que le bord de l’impression soit la limite de la pliure et repasser de nouveau les deux côtés. / Fold once again each side making sure the printing is now where the foldings happen.
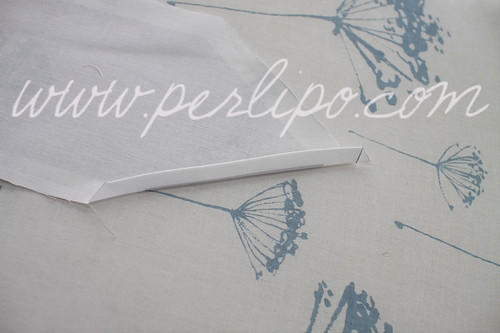
Faire ces deux dernières étapes avec le haut du toit. Couper les angles des côtés qui dépassent. / Reproduce these last two steps to make the top of the roof. Trim off the angles of both sides.

Coudre tout du long des ourlets précédemment repassés pour les maintenir fermés. / Sew all along the previously ironed hemlines to keep them closed.

Plier les deux triangles en allant vers l’intérieur du toit et en prenant pour guide les lignes du milieu du triangle ainsi que le bord extérieur et intérieur du triangle (sans les marges de coutures), endroit contre endroit, puis épingler à plat. / Fold in half both triangles of the roof, going towards the centre/center of the roof, right side onto right side, following the middle lines of the triangles as well as the outside lines (without the seam allowances) and then pin down.

Coudre ces plis à plat à quelques millimètre du bord des pliures. / Stitch them down flat at a few millimiters or 1/8″ from the foldings.

Sur son endroit, ça donne ça. / On its right side, it looks like this.

Faire la même chose que pour le haut du toit pour le bas du toit. / Do the same as for the top of the roof for the bottom of the roof.


En pensant cette fois-ci à replier vers l’intérieur les angles qui dépassent après avoir coupé l’excédent. / Thinking about folding inside the angles once they have been trimmed off this time.


Positionner ensuite les bords du toit sur l’extérieur du parking. / Pin down the edges of the roof on the outside of the car park/parking.

Coudre tout autour, en laissant le haut du toit libre, à quelques millimètres du bord. / Sew all around, leaving the top of the roof free, at a few millimetres or 1/8″ from the edge.

Faire un noeud à l’une des extrémités de la cordelette, puis placer l’autre bout sur la pompe à essence. La surpiquer et au besoin, repasser par dessus avec un point zigzag. / Tie one of the cord extremities and place the other side on the fuel pump and then topstitch it. To make it more secure, you can also do a zigzag stitch over it.

Prendre le grand carré imprimé, choisir un côté puis à l’aide d’un crayon à tissu, marquer son milieu. Refaire la même chose avec son côté opposé. De chaque côté de ces milieux, mesurer 2.5cm puis refaire une marque. / Take the big printed square, choose one side and mark its middle using a fabricl pencil. Reproduce the same with its opposite side. On both sides of each middle lines, measure 2.5cm or 1″ and place another line.

Placer les poignées repliées, tournées vers le milieu du carré, en utilisant les marques de chaque côté du milieu comme repère pour l’intérieur de la poignée puis coudre le long de la poignée à 1.5cm du bord. / Place the folded grips, turned toward the middle of the square, using the guides on each side of the middle lines to place the inside of the grips. Sew them down at 1.5cm or 5/8″ from the edge.

Epingler les deux grands carrés ensemble, endroit contre endroit, en prenant soin de mettre le parking sur un côté qui n’a pas de poignée. / Pin down both squares together, right side onto right side, making sure the car park/parking is not pinned to a side with a grip.

Coudre tout autour à 1.5cm du bord en laissant une ouverture d’environ 15cm. Puis retourner le tapis sur son endroit. / Sew all around at 1.5cm or 5/8″ from the edge, making sure to leave a hole not sewn of about 15cm or 6″. Then turn around the playmat on its right side.

Epingler le trou non cousu en suivant le reste de la couture. / Pin down the opened hole following the rest of the seam.

Surpiquer tout autour du tapis à 6mm du bord. / Topstitch all around the playmat at 6mm or 1/4″ from the edge.

J’ai posé des pressions de manière à pouvoir maintenir le sac et ce qu’il contenait bien fermé, vous pouvez en faire de même de chaque côté, ou bien tout simplement plier les côtés et mettre une unique pression au milieu des poignées. / I have decided to put some snap fastenings on both sides as well as in the middle of the bag in order to keep everything in the bag and not lose anything but you might want to consider putting only one snap in the middle of the grips.


Maintenant les voitures et leurs chauffeurs, passagers… Positionner les deux parties de chaque éléments en semble, faces contre dos, l’endroit du tissu à l’intérieur. Les morceaux doivent correspondre parfaitement. / Now to make the cars and their drivers and passengers.. Place both parts of each element, the top piece on the back piece, the right sides of the fabric inside. The pieces should match perfectly.

Coudre autour de chacun de ces couples à 6mm du bord en laissant à chaque fois une ouverture non cousue d’environ 5cm. / Sew all around all these couples at 6mm or 1/4″ from the edge, leaving each time an unsewn hole of about 5cm or 2″.

Les retourner sur leurs endroits et bien pousser les coutures pour épouser les coutures. / Turn them around on their right sides and push the seams as much as the possible to make some nice curves.

Les remplir avec de la ouate. / Fill them with polyfill.

Epingler les ouvertures. / Pin down the openings.


Et enfin coudre ces ouvertures à la main avec du fil et une aiguille. / And finally, handsew down the remaining openings with a needle and some thread.


Si vous souhaitez voir des photos du Carabag en action, rendez-vous ici. / If you want to see some action pictures of the Carabag, have a look here.
Si la perspective de faire autant de couture ne vous réjouis pas, vous pouvez également acheter un Tapisak tout fait par les petites mains d’Arkidée. / If the perspective of sewing doesn’t really enthusiast you, you might want to consider ordering a Tapisak already made by the gifted hands of Arkidée.

merci pour ce tuto, très bien expliqué ! à voir si j’ai un ptit mec pour un #2 ^^
Haha ! Je te le souhaite, c’est chouette d’avoir un petit mec !
Coucou Perli,
je passe par ici, si des lectrices, admiratrices, fans… ne savent pas coudre et veulent un carabag, je serais prête à en faire contre troc ;).
(Je me rapelle l’avoir lu sur fb ^__ ^).
Bises ! Camille.